background

Showing posts with label decor. Show all posts

Saturday, December 21, 2013

DIY Snow Globes


Last Christmas I made some DIY snow globes inspired by a pin I saw in Pinterest. I've gotten so many compliments so I thought if do a tutorial. A few of these will be gifts this year and they are definitely budget friendly. I already had everything I needed except for extra trees so this project cost me less than $3. 
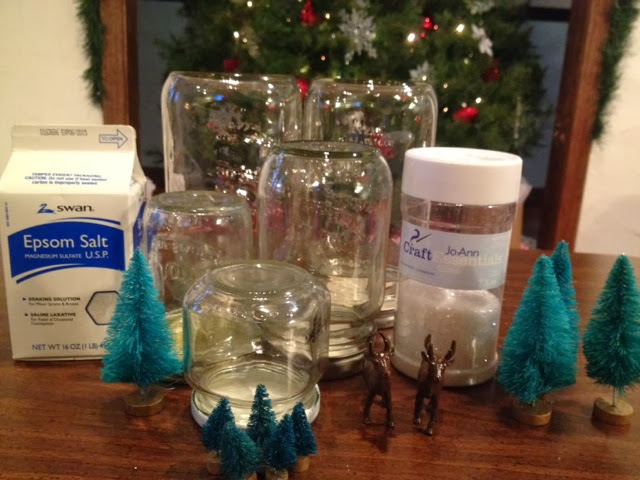

You Will Need
Glass jars if varying sizes (wide mouth if using mason jars)
Glue gun
Epsom salt (mine is from the dollar store bought last year)
Clear or white glitter (optional)
Bottle brush Christmas trees (mine are from Ben Franklin)
Little critters if you want

I started by laying out all my jars and supplies so I could see how many little trees would fit in each one.


Next I cut out little bits of cardboard so I could make my trees sit up higher. If you skip this step your trees will sit much lower and you will barely have any snow in the bottom if your jar. Little wood dowels would work well too.


I started gluing the little bits of cardboard to the bottom if the trees. While those were drying I glued my mason jar lids together. Don't hot glue your thumb like I did... I forgot how much that little bit of glue could hurt!!!

After putting everything together I added the Epsom salt and glitter to the bottom of the jars. I just eyeballed this and added enough to where I thought it would reach the bottom of the trees. This was definitely trial and error but there's no easy way to try and measure it out.


Finally, I glued the lids on and voila! Done!


Wednesday, August 7, 2013

Side Table Refinish

This adorable little side table was a freebie find on craigslist! It's in pretty good shape structurally and seems sturdy enough. The only issue with it was that it needed to be refinished. Um... for free I'm willing to do it!


This is what I was working with to start. The stain was splotchy, there were water marks and it was completely uneven.


 I started by sanding with fine grit sandpaper (220). This piece didn't have a top coat or anything so I wanted to make sure I didn't strip it too far down. 


The fine sandpaper worked perfectly and I was left with this medium colored wood.


To get an even coating without brush strokes I decided to apply my stain with a washcloth rather than a brush. (wearing gloves of course!) I made sure to only put a little bit on the washcloth at a time. I didn't want it go on splotchy. Working in small sections is key.

I prefer darker woods in my home so I used Dark Walnut by Minwax. As you can see, it was quite dark!


After letting it dry for a few hours I drilled a hole in the front of the drawer and added this cute little crystal knob! It looked like it was missing something and this totally did the trick!


I absolutely love the result! Even though I'm not pregnant yet, I've already planned to put it in the future nursery for a side table next to the glider. It's the perfect height and will be great for a little lamp.


This was such a cost effective project. The table was free, I already had the washcloth, gloves and stain so the total price was only $3 for the package of sandpaper! And, because I only used 1/2 of 1 of the 4 sheets, it really only cost me  about $.38! SCORE!

Monday, July 8, 2013

Mirror, Mirror On The Wall

I'm all about mirrors. I have them all over the house and I keep buying more. I love how they reflect light and open up a dark room. Plus, sometimes it's nice to be able to take a quick peek to make sure I look ok. You know, no eyeliner smudged, hair's not a mess, whatever.

I'm totally a craigslist fiend and am all about finding things for cheap or free! Awhile back I found this adorable antique mirror for only 20 bucks. I hopped right on it and had John pick it up on his way home from work. He, of course, thought it was hideous. It was this awful painted brown wood with gold trim. Not our style.

BUT. Anytime I'm looking at home decor, I always look past whatever color it is and look at what it is. Can it be painted? Can it be stripped and stained? This is the key. About half the items in my home have been refinished! That's the secret. It's so satisfying to take something "ugly" and turn it into something beautiful.

And even better, I can use paint that I already have to match the item to other decor in the room! When I bought this mirror I had absolutely no idea where I wanted to put it. I just knew I had to have it. After contemplating for a week or two I thought I would be a great future nursery mirror for over the changing table. (earthquake proofed of course, so it's safe!) Although we aren't even expecting yet, I figured this would be perfect. So, I broke out the nursery wall paint (Glidden's Swan White) with plans to hang it on the gray accent wall in there.

How To Repaint a Mirror

First, I carefully taped out the entire mirror with Green Frog Tape and laid the mirror down on some paper bags. (cardboard works too)


Then, I used my paint brush to dab in between all the finer details. This ensures that there will be no brown paint peeking through. I like to use an artists brush for projects like this (with less surface area). They are easier to handle, can get into all the nooks and crannies and leave less brush strokes.


Next, I added three coats (with about 25 min drying time in between) to the entire mirror.


Finally, I let it dry for about 3-ish hours, removed the tape, and voila! A beautiful new mirror!


I don't know why the reflection of my ceiling looks green in this pic, but I promise, no green ceilings in my house! The mirror looks a million times better! And all together this project only cost me $20 for the mirror since I already had the paint, tape and brush. Wa-hoo!!!


Thursday, May 23, 2013

Chalkboard Blessing

I saw this beautiful free printable on Shanty 2 Chic and fell in love with it! I immediately decided to borrow the design for my front entryway chalkboard. (well, we go in from the back door, so technically the back entryway?)


This chalkboard was one of my absolute favorite wedding gifts we received. Our friends are restoring their 1930s home and they made it using one of their home's original windows! Such a neat gift and so personal! 


Let me say though, I am in no way an artist and have always struggled with anything drawing, painting, handwriting, etc related. This took me absolutely forever and had lots of re-dos involved! After cursing at myself for half an hour, this is how it turned out! While I still believe the original is much more beautiful, I was pretty pleased with mine! (especially for a novice)


Here's a look at it on the wall!