background

Friday, May 31, 2013

Fashion Friday: Hawaiian Tropics


In honor of our upcoming trip to Kauai next week, I thought I'd get myself in the mood by finding some tropical/ Hawaiian inspired pieces. Now, tropical prints aren't really my style, but I think I'd rock that cute little wristlet! And maybe the maxi dress since it has stripes too...


Ok, now I'm officially dying to leave already! Wednesday can't come soon enough! =)

Tuesday, May 28, 2013

Homemade Liquid Fabric Softener

Recently, I was cleaning out my bathroom cabinet and found some conditioner that I bought and ended up not liking. I couldn't bear to throw it away at the time though, so I've kept it as "emergency conditioner." Well, said emergency has never happened so I decided to finally clear it out of the cabinet...

And then I remembered seeing a recipe for homemade liquid fabric softener, so I thought I'd try it! Pretty much anything cleaning related around here is homemade now... so I thought, why not!?

My husband was pretty skeptical about this one though, but I think it's because he walked in halfway through the DIY process.

He took one whiff of the vinegar and said "WTF IS THAT SHIT?! I don't want my clothes to smell like that!" hahahaha and this is while he was sick... I can't imagine how bad it would have smelled to him if he wasn't so stuffed up!

Apparently he hasn't realized this is the main ingredient in many of my cleaning products and that the clothes won't actually come out smelling this way! (thank god)

(I do almost all my cleaning while he is at work so he has no clue about the smelly vinegar I deal with all the time!)

Homemade Liquid Fabric Softener

What You Will Need:
Empty Bottle (I used an empty Purex Crystals Bottle)
3 Cups Distilled White Vinegar
2 Cups Conditioner
4 Cups Hot Water
(water needs to be hot to break up conditioner)

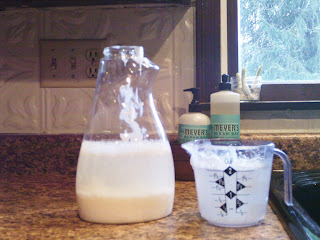
Step One: Measure out 2 cups of conditioner. Pour in bottle.


Step Two: Measure out 3 cups of vinegar. Pour in bottle.


Step Three: Measure out 4 cups of hot water. Pour into bottle.


Step Four: Shake gently to incorporate. 
Use the same amount you normally would in washer.


Ta-Da! Homemade liquid fabric softener!
I admit, before making this stuff homemade, I never used liquid fabric softener.
I always thought it was too expensive and would just rely on fabric softener sheets in the dryer.
Now I get the best of both worlds! Wa-hoo!

Friday, May 24, 2013

Fashion Friday: Lace & Crochet For May

I'm obsessed with this season's lace and crochet swimwear! 

Unless you've been living under a rock, 
you had to have noticed that lace and crochet are everywhere right now! 

Here are a few cute, affordable options to satisfy your lace and crochet cravings!


I couldn't control myself... 
I just bought the turquoise lace bikini for my upcoming Kauai trip!
(even though I already have about 5 or 6 bikinis... I need one for each day of the trip, right?!) 
BUT, in my defense, Victoria's Secret is having a swim sale right now!
 I got a $55 bikini for only $31.98! 
SCORE!

Thursday, May 23, 2013

Chalkboard Blessing

I saw this beautiful free printable on Shanty 2 Chic and fell in love with it! I immediately decided to borrow the design for my front entryway chalkboard. (well, we go in from the back door, so technically the back entryway?)


This chalkboard was one of my absolute favorite wedding gifts we received. Our friends are restoring their 1930s home and they made it using one of their home's original windows! Such a neat gift and so personal! 


Let me say though, I am in no way an artist and have always struggled with anything drawing, painting, handwriting, etc related. This took me absolutely forever and had lots of re-dos involved! After cursing at myself for half an hour, this is how it turned out! While I still believe the original is much more beautiful, I was pretty pleased with mine! (especially for a novice)


Here's a look at it on the wall!


Wednesday, May 22, 2013

Homemade Windex

As I mentioned in this post, I'm always looking for ways to save money on things that I need.

When I came across a recipe for homemade Windex I about jumped for joy!

We go through a ton of Windex around here. I use it to clean counter tops, wipe down all our appliances, clean mirrors and of course, clean windows!

I love this recipe because it works exactly like the real thing and it is so much cheaper to make than to buy. I mean really, why pay so much for something that's mostly water?!


What You Will Need:

Spray Bottle
1oz Ammonia
4oz Isopropyl Alcohol
Water

Step One: Pour 1oz Ammonia in spray bottle.


Step Two: Pour 4oz Isopropyl Alcohol in bottle.


Step Three: Fill with water. Shake gently to mix.


It's that simple! Homemade Windex for pennies on the dollar! 


Monday, May 20, 2013

Peanut Butter Chocolate Pretzel Crunch Cupcakes

When I saw this recipe on Happy-Go-Lucky I knew I had to try it! John and I both love peanut butter. And chocolate. And pretzels. And anything sweet and salty. This had Wallace written all over it!

We never keep this kind of stuff around the house though because we'd eat it all! Luckily, or rather, unluckily, John's good friend Martin is switching jobs so I decided to make these to send to work with John on Martin's last day.

While I love doing things homemade, baking a cake from scratch is something I still haven't tackled. I've done pretty much everything else, but for some reason I've yet to do cake. Go figure.

I decided to try making the box cake taste more like homemade by doing a few tweaks I found here. It's pretty simple... you just replace the water with milk, add an extra egg and replace the oil with melted butter (double the amount).

Original Cake Recipe
Betty Crocker Triple Chocolate Fudge Cake Mix
1 1/4 Cup Water
1/2 Cup Oil
3 Eggs

Better Cake Recipe
Betty Crocker Triple Chocolate Fudge Cake Mix
1 1/4 Cup Milk
1 Cup Melted Butter
4 Eggs


The batter was a bit more fluffy than normal box cake batter, almost like a mousse and it tasted amazing. I licked the beaters when I was done mixing, of course.

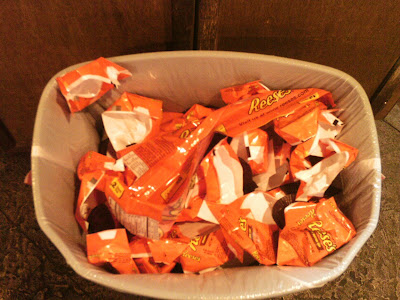
I added Reese's Peanut Butter Cups to the bottom of each cupcake and I was a bit disappointed! I haven't bought them in quite some time and they have seriously gotten smaller! Plus, It took forever to unwrap all 24 of them. They should sell them unwrapped in a big bag or something. That would be awesome.


While they cooled, I started on the Peanut Butter Icing. 
And tried a cupcake of course. 
I picked the smallest, weirdest looking one and ate that.

OH MY GOD! 
Changing up the recipe made a HUGE difference.
It was so rich and moist and gooey and AMAZING!
I had to stop myself before I ate them all... and this was before the icing and pretzels!

What You Will Need:
5 tablespoons unsalted butter at room temperature
1 cup creamy crunchy peanut butter
1 cup confectioners' sugar
1/2 teaspoon vanilla extract
1/4 cup half and half
Crushed Pretzels

Step One: Add all ingredients except the half and half.


Step Two: Mix until creamy. 

Step 3: Add the half and half and mix until fluffy.


Step Four: Frost all of the cupcakes and add the crushed pretzels.  

(I don't know why this is so blurry.. sorry!)

Let me tell you, these cupcakes are to die for!!!
Good thing I made these to send to work with my husband!
Otherwise, I'd eat them all! 

Sunday, May 19, 2013

Fashion Friday: Mint-spiration!

I don't know if you've noticed, but mint is the IN color right now. 
Everywhere you look, it's all about mint! I've totally jumped on the band wagon! 
I already have a tank, some nail polish and the adorable crochet shorts below! 
Here are a few cute, affordable looks all available at Target!


I'm thinkin I need that watch and that belt! And maybe the scarf too...
What color are you totally in love with this season?

Saturday, May 18, 2013

Soap Scum Be Gone!

Cleaning the shower seems to be a constant battle for me. I clean the shower and soap scum comes back a week later. We have must have hard water out here in Buckley because I swear we didn't have this issue when we lived in Federal Way. Plus, my husband is a diesel mechanic so he makes some serious nasty black grease marks everywhere. I keep telling him he needs to install a shower in the garage. Maybe one day... a girl can only dream.

Anyways, awhile back I found this post on Pinterest and thought I'd try it out. It seemed like a cheaper and more natural way to clean the shower ...although, I was skeptical as first because it's posted as a recipe on food.com ... but people are weird I guess.

  All the articles I found specifically recommended the blue dawn, so I didn't mess with it. I do know it's the stuff that's used to clean up birds affected by oil spills, so obviously it's tough stuff that's still gentle on your skin. (It also has a cute little penguin on the front of the bottle)

BEWARE!  The first time I tried this I about died coughing! The smell of hot vinegar in a shower stall becomes overwhelming! I usually spray it down while pretty much holding my breath then shut the shower stall door and run away.

Soap Scum Be Gone!

What you will need:
4 oz Distilled White Vinegar (HOT)
4 oz Blue Dawn Dish Soap
Spray Bottle

Step One: Heat up 4oz of vinegar in microwave for 1-1.5 minutes. 


Step Two: Pour 4oz of soap in spray bottle. 
(I use a spray bottle with measurements on the side.)


Step Three: Pour hot vinegar in with soap. Swirl together.
(don't shake too hard or soap will get really sudsy)


Step Four: Spray down entire shower. Let sit for 1-2 hours.
(I usually do 2 hours so it can really work and then I can do other things
like laundry, vacuuming, ... or Pinterest. You know, important stuff.)

Look at this soap scum before I cleaned it! So gross!!!

Step Five: Wipe down with sponge, cloth, etc.
(I like to use these scrubber dish cloths)


Step Six: Rinse, making sure not to completely soak your clothes when the water runs down the wall the way I always do. Oops.

No picture for this. 
I'm not bringing my camera anywhere near water.
I'm far too clumsy.

 Look at the difference!
Since I started doing this I've noticed a huge difference in how quickly the buildup comes back and the effort I put into scrubbing is minimal! Wa-hoooo! (it's funny the things that get me excited now that I'm a housewife! haha)


Wednesday, May 15, 2013

Makin' it up Mt Peak

Yesterday my bestie Stephanie and I climbed Mt Peak in Enumclaw. 
We hadn't done it in quite some time, so we were definitely in for a hard workout.
 I always do Cal Magnuson which is the harder side of the mountain to climb, 
but it's a quick hike and is only about 2 miles.


 This is a steep hike, I wish pictures did it justice!


 We got a sneak peak of Enumclaw about halfway up.


 We met this cute little guy at the top. 
He obviously is accustomed to people! 
He came right up next to me a few different times!


 We saw some cool looking columnar basalt along the way too!


Afterwards, we refueled with a big Cobb Salad from The Whitehouse, 
a brand new restaurant in Bonney Lake.
 And some yummy garlic fries! 
SO delicious!